 The drag and drop interface is really useful for visualizing your workflows but you can't do everything without writing some code. In Part 2, we are tasked with modifying the OOTB Promotion Request Approval Process workflow to require approvals based on the file types attached to the Promotion Request. Requirements: The workflow modifications we are going to make have two basic requirements.
Initial Setup: If you haven't already saved a copy of the Promotion Request Approval Process workflow from Part 1, go ahead and do so. We don't want to interfere with the OOTB workflow until we know our code works correctly. Make sure to give it a relevant name and check it out. Initial Thoughts: Let's think about requirement 1 for a minute. There are two ways we can go about doing this.
Potential Issues: Like most solutions, each one comes with its own set of issues. It is impossible to get it perfect the first time and hard to get it perfect in any reasonable amount of time. You are limited by what the software allows you to do, your thinking skills, and the information given to you in the form of requirements. Thinking ahead about how the users will interact with the workflow and what they will do right and wrong is important in order to mitigate problems with your workflows. I always try to get a proof of concept working to make sure what is needed is possible before I start to think about all the ways a user can mess up. If there are ways to avoid problems by either writing more code or making instructions more clear, then you should consider spending the time to make the changes. Workflows will not save you time if they are too complicated or too difficult for the users to understand. Consider making a Visio diagram of your final workflow with brief descriptions of each step to hand out to users so they can see what needs to happen in order for their files to be approved. Create the Workflow Layout: We will start by first making the layout of our changes via the drag and drop editor that you have become familiar with in Part 1. You are basically doing the same thing you did there but lets make some slight changes to each activity.
 Initial Workflow Layout Changes All the assigned activities are linked together such that the next one only kicks off if any required previous ones were approved. Hold on though, what happens if a user makes a promotion request that contains only a WTPart and Document? According to this layout, it will still go through the CAD Approval activity first. That's because we haven't added any logic yet to check which activities should be activated. There are two ways to think about this part of the workflow.
Psuedo Code: If you are just starting out or if you like to make notes of your thinking process, I recommend writing psuedo code. This is just a mix of human understandable words and basic code syntax which allows you to visualize what your code needs to do. You should not feel embarrassed doing this. It is much more important being able to understand what needs to be done than to know the code that does each part. If I were to make psuedo code for out sequence of events it would look something like this maybe in a diagram form.
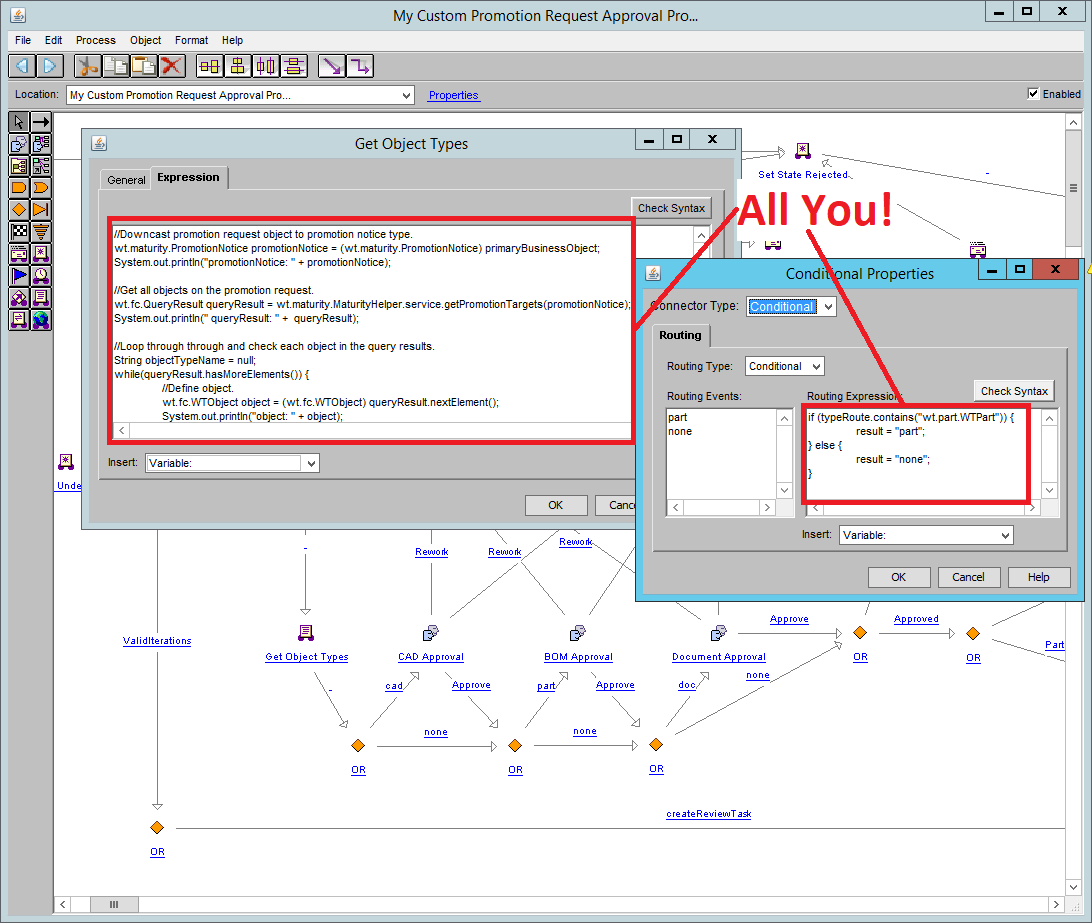
Expression Robot: Now that we have our psuedo code, we need to figure out where to put our actual code. You have probably noticed than many robots have tabs where you can type code. There are many ways to do this but in order to keep things easy to understand, we are going to use an expression robot that starts before the activities. Something like this: 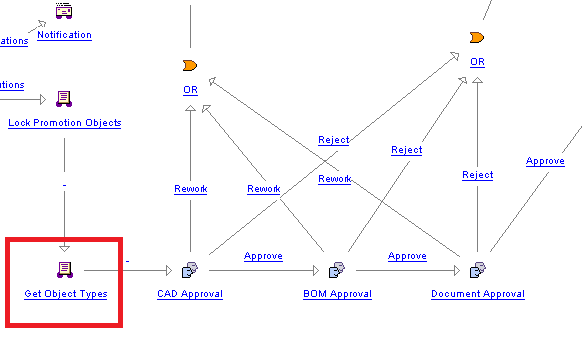 Get Object Types Expression Robot Added Get used to giving all blocks relevant names. This is a simple procedure that makes updating and troubleshooting your work easier especially when you start to have more than one expression robot. Your First Workflow Code: Now this part is going to be a little bit more difficult. A lot of learning this stuff involves seeing working code and how it is used. You should download a copy of the Windchill Java Docs so you have the code reference for possible things you can do. This is the actual Windchill API you will be working with. There isn't any autocomplete or suggestions when writing code in the workflows. All you have is a syntax check which will do 2 things:
Get Object Types Expression Robot Code
Workflow Variables: You may have noticed that there are some local variables defined in the above code as well and one called "typeRoute" which doesn't appear to be declared anywhere. What is this? This is a workflow variable. A workflow variable is a variable that can be read and set in any block. Why do we need to use these? You need to start thinking of workflow blocks as private code. Anything that goes on in one block is not viewable by another. What this means is that in order for block A to communicate with block B, we need to have block A set the value of a workflow variable and have block B read the value from that same variable. We cannot pass local block variables between blocks. Where are these defined? On the main workflow editor page, there is a properties link in the top toolbar. From there you have a variables tab that lists all of the workflow variables in the workflow plus options to create new or update existing ones. You are limited to the types of variables you can create here. If I could choose any variable type that Java has to offer, then I would choose to make typeRoute a list. Since that option is not available, we are going to have to go to old csv route so we will make typeRoute a string. Make sure to set the variable to allow for read and write access. I just set it to full control to make things easy. Tip: Wherever you can type code in a block, there is usually a drop down list called "Insert" that shows all of workflow variables you have to work with. Outputting Information to the Logs: You can see that I have included a lot of "System.out.println" lines. I do this because it makes things much easier to debug later on. If you want to output variable values or any other information to the logs, add these lines. A sample of the log output is below. 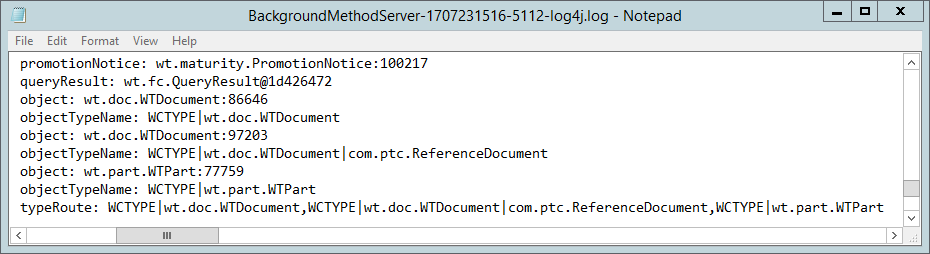 Background Method Server Log with User Defined Output Activating Appropriate Activity Types: We have our code but what is it actually doing? It is creating a csv list in the string variable typeRoute of unique object types. What it is not doing is telling the activities when to run or not. We need a few more blocks to read the typeRoute variable and determine whether the activity should be ran. I will do this with Conditional blocks using the below code. 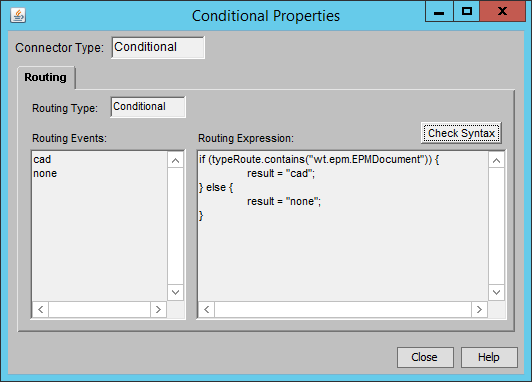 Conditional Block Code to Determine if Activity Should be Ran A few things to mention about the above.
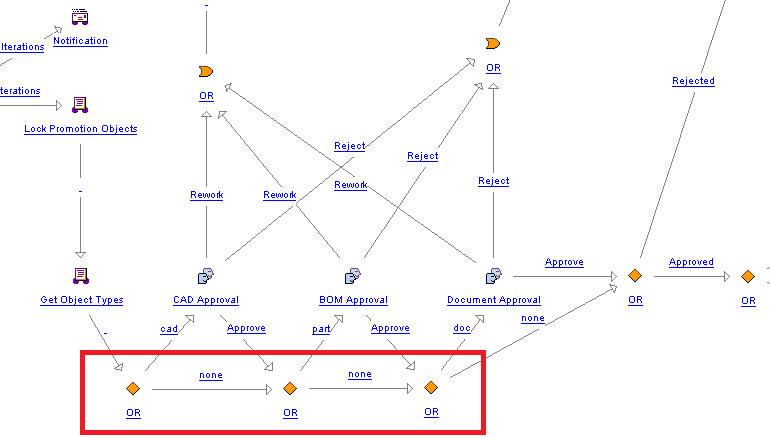 Workflow with Conditionals to Start Activities Based on Object Type(s) I have the code to just check the parent type. We are currently grabbing the information for sub types as well. How would you go about further filtering based on subtype? If I have a document where there are 2 possible subtypes, I would:
Optimization: What we have done with all this code so far only really affects the approval route. I just had you follow the original path for Reject and Rework. What if you had a promotion request with a CAD document and a document and you selected rework? According to our code, the rework route would take the workflow back to before the CAD document was approved which means that after the creator gives more information and completes the rework task, the CAD approver will get another task for the same object. You have two options here:
Rejecting the Activity on First Reject Vote: The last part of the code we need to implement is the rejection code. We want the CAD approval activity to go to the rejection route immediately when the first reject vote comes in. This ensures we aren't waiting for everyone else to vote when we already know the the results. Go to the CAD approval activity -> Transitions tab. This section allows you to run code depending on what has happened to the overall activity. We want to use the Complete Task transition because we want to check for reject votes after each task is completed rather than when the entire activity is completed like it is doing now. 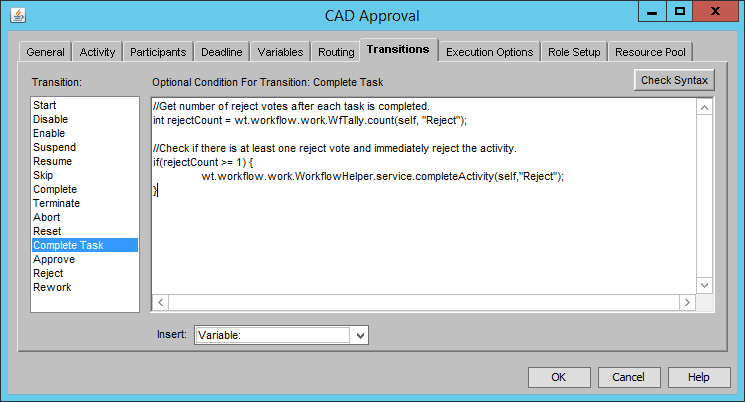 Reject on First Reject Vote Test it out by adding two people to the design engineers role and reject with one. The promotion request should then be rejected and the task on the other approver's list should now be gone. Extra Credit:
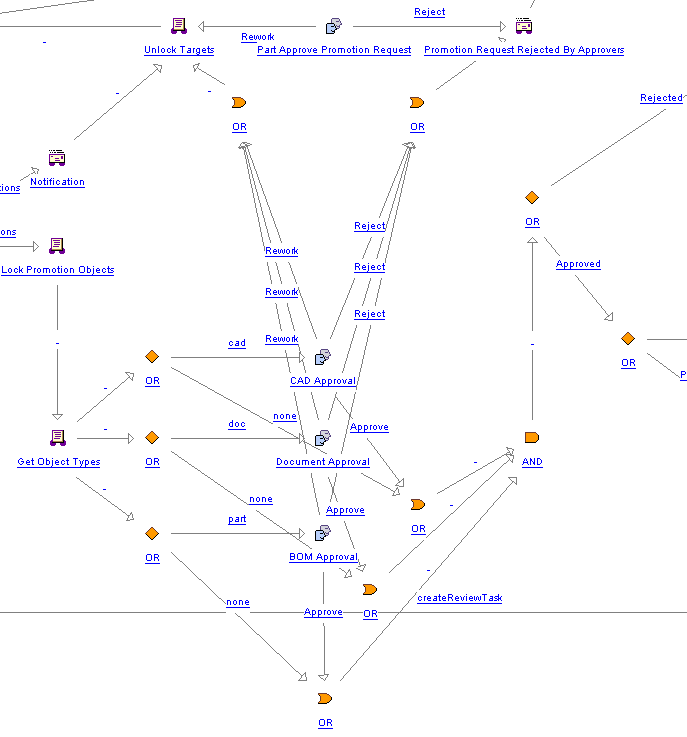 Running Required Tasks in Parallel What's Next:
That's all for Part 2. You can see that it is not too difficult to make meaningful changes once you have some sample code to work off of. In Part 3, we will start using workflows to interact with the server. This is something that you can't do in the drag and drop editor. Stay tuned to see how much further you can take your workflows!
4 Comments
Philipp
8/21/2017 06:19:52 am
Dear Erick,
Siddharth
7/4/2019 09:56:40 am
Hi Phillip,
kannagi
4/10/2021 04:10:36 am
Hi Erick
Rajnandini Yadav
6/2/2021 11:41:42 am
Your blog is very informative Your comment will be posted after it is approved.
Leave a Reply. |
AuthorErick Johnson Archives
May 2024
Categories
All
|
 RSS Feed