 Windchill Admins and Customizers, It is finally your turn to learn how to work with Windchill Workflows! This series will shed light on the mysterious ways that workflows work and how you can manipulate them to do just about anything you want with the Windchill API and a little Java grease. I know trying to learn this stuff has always been a big pain to many people but don't worry! I will make it so easy that you will be impressing your boss in no time! In Part 1, we will go over the basics of what a workflow is and do some high level manipulation via the Workflow Administration GUI. You don't need to know how to write code....yet... What are Workflows? Windchill Workflows are basically little snippets of code that automate tasks in Windchill. They send emails, create and assign tasks, change the lifecycle states of objects, and much more. Their purpose is to save you time and force a certain standard process on your users. Why do I need them? A few reasons:
Do I need to learn/know how to code in order to use Workflows? You don't need to be a coder to make basic functional changes to existing workflows. If you want to be able to make use of the their true power, then you need to be able to code in Java. Thankfully, workflows are actually a great place for beginners to start. Because you aren't making a full fledged app, you can focus on just writing code. You don't even need to use Eclipse or some other IDE to make changes. You can use a simple code editor like Visual Studio Code. You sold me (Maybe?). Continue. Sure, so now that you know of their importance and what they can do, let's take a look at one of the two main OOTB workflows included in Windchill. Promotion Requests: A Promotion Request is the most basic major workflow in Windchill. Most customers who use workflows will at least use this one. It is a simple request for a lifecycle state change. What the user does:
What the Approvers do:
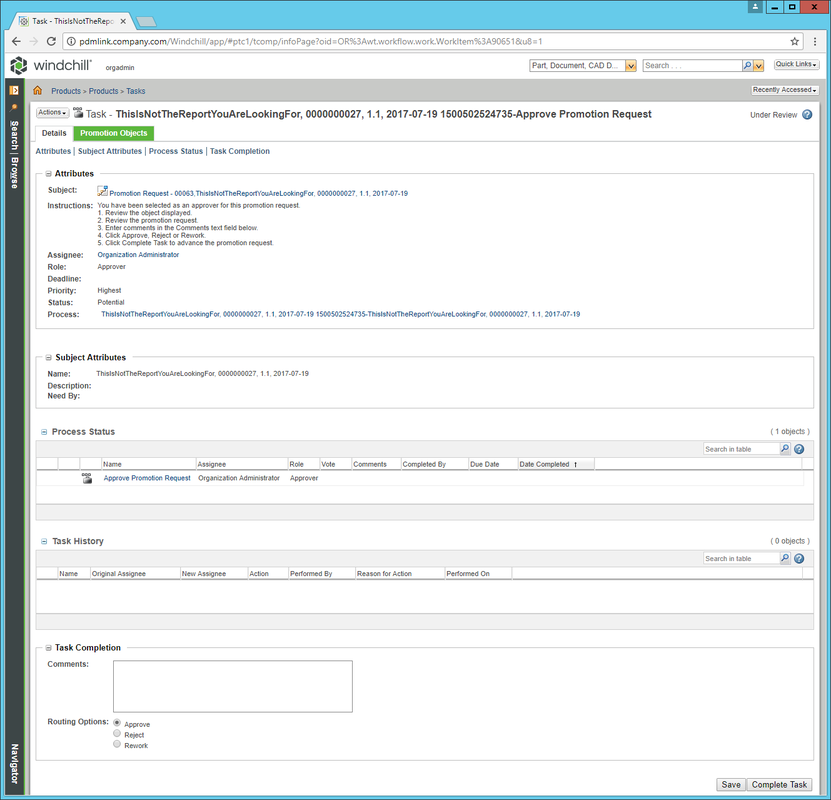 Promotion Approver Task What the Workflow does:
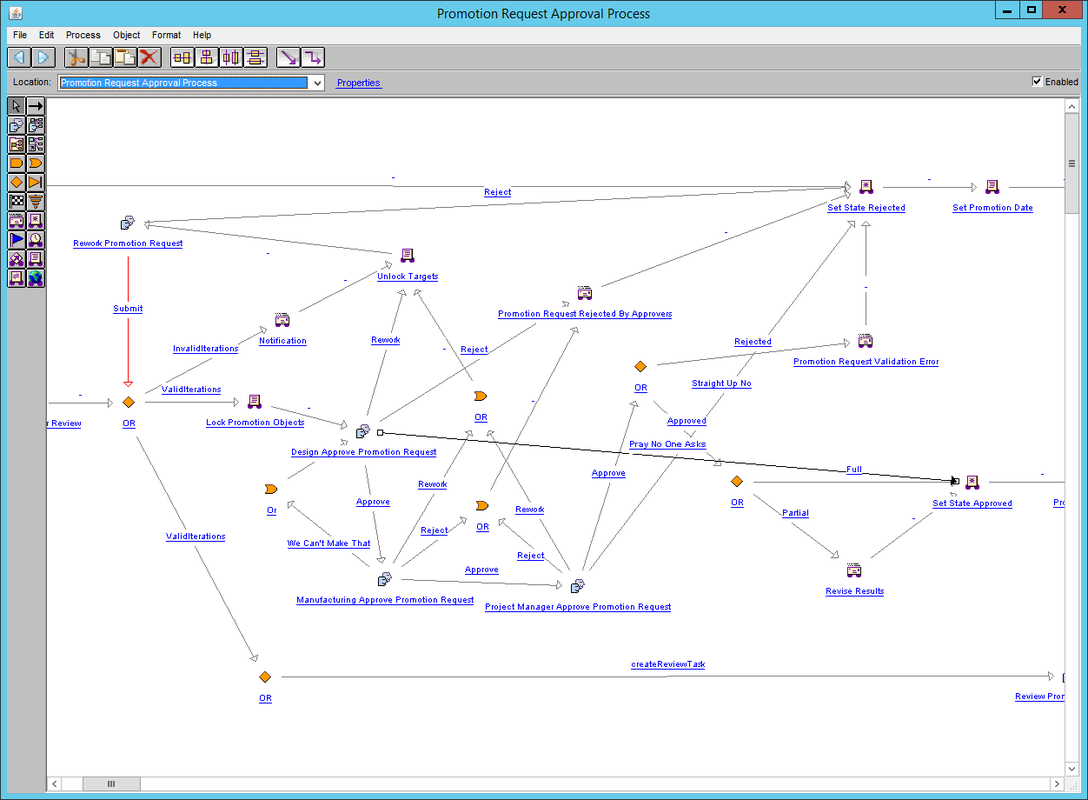
Where do I go to access workflows in order to make changes? Because OOTB workflows reside at the Site level, you need to login as a Site Administrator (wcadmin by default). Then go to Browse -> Site -> Utilities -> Workflow Template Administration. You can see a bunch of OOTB workflows there already plus one custom one I made in the screenshots above. We will get to that custom one in another part of the series. For this part, we are going to focus on the Promotion Request Approval Process since that is the one we just went through. Right click on that workflow -> Edit You will notice a small window saying not to close it. Don't close it. That handles saving changes you make to the second window that was opened showing the actual workflow. Only close that small window once you save and checkin your workflow changes. What do all of these icons mean? If you think the interface looks old, you are correct. That interface hasn't been updated in a while. That plus the general blandness has always turned people off from going here. You need to focus your attention on the content rather than the design. Let me explain what some of the major icons on the screen do. You can learn more about all of the rest from the Windchill Help Center. Assigned Activity: This one is used to:
The rest are fairly straight forward based on their name i.e. the Notification icon is used to send an email not attached to a task to users. This is useful for letting you know that things are moving along in the process. The OR connector requires only 1 connected item to complete before it kicks off the rest of the attached code. You can also use these to route you workflow lines in order to make the workflow display appear cleaner. The AND connector requires all connected items to complete before going forward. The Conditional connector routes based on some code you put in it. Click around and explorer the code. Try to visualize an object being processed through the code and what each block does. This will help you to better understand. Below is a brief visual explanation to help it sink in.
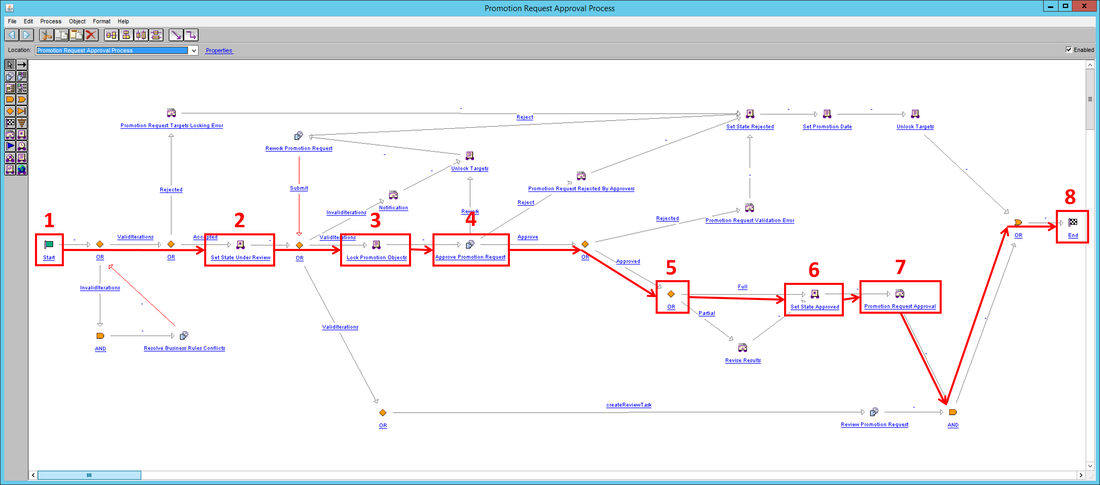 Promotion Request Approval Route Show me how to make changes already! Okay! Let's get straight to it. One of the most common changes customers want in the Promotion Request Workflow it to have a multi-stage approval process. The reasons for this are:
Step 1: Let's say our requirements are such:
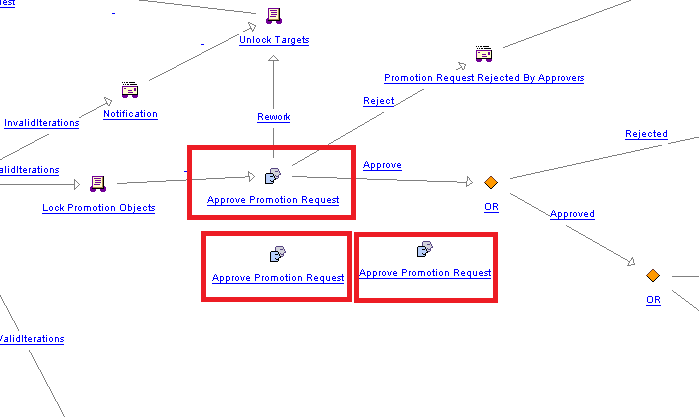 Assigned Activity Copy and Paste Step 2: Now that we have 3 copies of the assigned activity, let's look at how the original activity is connected to the rest of the workflow.
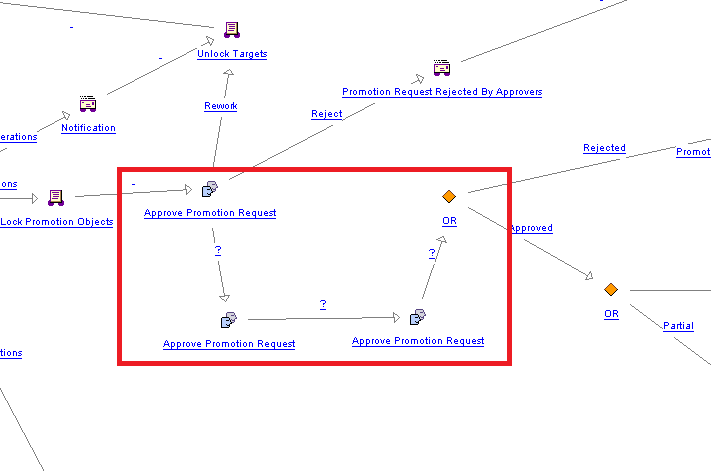 Assigned Activities Connected in Sequence Step 3: The activities are all linked now. But what about those "?" marks? We need to tell the action arrows when to kick off the next activity. In this case, we want the next activity to start only on Approve. Click on each question mark and set Approve to "Start". You will notice the last activity doesn't have a "Start" option. Why is that? The options that are given depend on what the arrow connects to on both ends. Because the end of the last arrow only connects to a block that is not an activity, it just needs to fire i.e. run code instead of initiate an activity. Set the last arrow to fire. Step 4: We aren't done yet! We only gave options for the Approve route. What if the other activities has a reject or rework vote? Right now, that would cause the workflow to fail and stall. It is important to provide routes for all routing options in each activity. Go ahead and mirror the arrows routes and actions from the original activity to the other 2 we made. 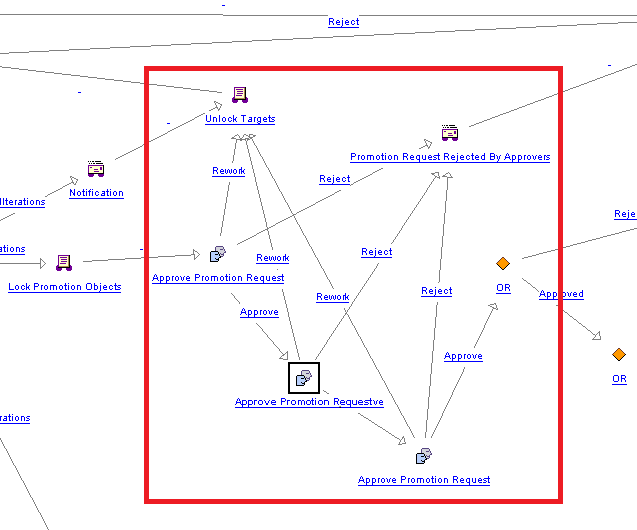 Assigned Activities with All Routes Connected Step 5: You can see that the web of lines begins to make things difficult to read and understand. You can drag the activities around until you can clearly see everything or use OR blocks to routes lines in a less direct and thus less intrusive manner. 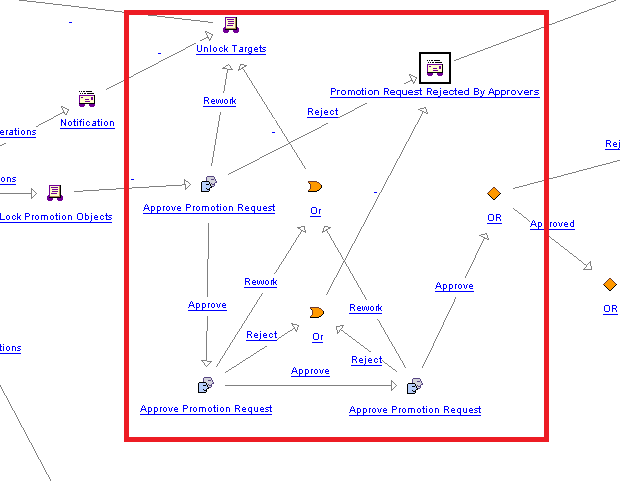 Assigned Activity Route Connections Cleaned up with OR Blocks It's still not the prettiest thing but you get the idea and you can always manipulate things further. Try to keep things as simple as possible. Step 6: Since we have all the connections made, let's go to each assigned activity, give each a unique name, change the required roles, and set the vote tally per our requirements. Step 7: With our changes complete. Let's go ahead and save. In the Workflow Administration page, you will see that typical checkout icon next to the workflow we were modifying. If you don't, refresh the page and you should see it. Right click on the workflow and check in leaving any comments you think will help you remember what you did. You can finally close that small window when you are done. Testing: Now it's time to test our new workflow changes! Remember that I added 3 different roles in the assigned activities so I need to make sure to add those same three roles to the product team page and populate them with the appropriate amount of people. Once that is done, just create a promotion request like normal and confirm that each assigned activity only shows up after the previous one is completed. I won't show you this part since I have already shown you the process in the very beginning. Outside of the obvious "I didn't get a task", how do I troubleshoot Workflows? Let's say your workflow has stalled. The first thing you should do is login as an organization administrator, go to the promotion request -> Process tab -> Right click on Routing/Process History item -> Open Process Manager. The process manager will show you the status of the workflow and where it has stalled. From there, you just go through the normal motions of resolution i.e. logs, queues, workflow not able to handle what users have done, etc. Important: Always make sure to test on a test system so you avoid interfering with production work. The changes you made are effective immediately on the next Promotion request that is made. What if I don't have a test system? There are still ways to mess around with workflows even if you are doing so directly on a production system. It would be ideal if you created a separate private product for you to do your testing in for what I am about to show you. If you can't do so then you can still do the below and just hope that users don't get curious.
What about the Windchill API?
You technically worked with it and you didn't even know! We will get to the coding aspect of the API a little bit in part two and then much deeper in part 3 so stay tuned!
10 Comments
Karthi
2/7/2018 07:47:44 am
Great Tutorial, better than PTC's documentation. Keep up the good work.
Beena
11/26/2018 08:57:40 am
Can you help me undo a deleted promotion request in which 7 persons have already approved the document
Albert
3/21/2019 04:06:14 am
Great blog
Thomas
3/23/2019 04:11:39 am
Awesome explanation! You do the work for free, that the expensive PTC eLearning should do!
Raja
5/24/2019 09:41:31 pm
Thanks for putting this together Erick!
Anil Kumar H R
6/12/2019 11:39:28 am
Thanks a lot for this great blog
Mark
12/16/2020 08:39:05 am
Thanks, great refresher for a guy who's probably way deep over his head. Keep up the good work!
Vaishnavi
12/26/2020 12:13:04 am
It's helpful 😀😁..
Puneet Jain
5/9/2021 04:43:11 pm
Hey Eric, Your comment will be posted after it is approved.
Leave a Reply. |
AuthorErick Johnson Archives
May 2024
Categories
All
|
 RSS Feed