ERICK'S BLOG
  • Home
  • Music
  • Blog
  • Apps
    • Mortgage Calculator
  • Windchill
    • Windchill Customizations
    • E.P.L.E.S.
    • Export Released
    • Document Exporter
    • Document Worker
    • Property Checker
    • Windchill Business Analytics >
      • Part 01 - Program Logic
      • Part 02 - Getting Data with SQL Queries
      • Part 03 - Automating SQL Queries
      • Part 04 - Converting SQL Results to XML
      • Part 05 - Data Processing and Manipulation
      • Part 06 - Displaying XML in HTML
      • Part 07 - Auto Updating Displayed Data
      • Part 08 - Hosting Webpage with an Existing Apache Installation
      • Part 09 - Running Multiple Queries In Sequence
      • Part 10 - Calculating Data Trends
      • Part 11 - Making It Modular
    • Windchill Quick View
  • PowerShell
    • Blog & Examples
    • Excel Reference
  • Contact

How to Install Windchill 13 with SQL Server 2022 - Part 3: Installing Windchill

5/9/2024

0 Comments

 
Picture
You are finally ready to install Windchill... if you've successfully completed Part 1 and Part 2.  For Part 3, we are going to walk through the Windchill installation process.

Relevant Documentation

As mentioned before, here is a link to the install guide:
https://www.ptc.com/support/-/media/support/refdocs/Windchill_PDMLink/13,-d-,0/WCInstallConfigGuide_13_0_1_0.pdf?sc_lang=en

​I do recommend reading it at some point so you can check that box.  For now, just relax and follow my steps below.  I've gone through the pain so you don't have to.

Running the Installer (PTC Solution Installer)

The first thing you need to do is extract all of the discs you downloaded earlier. 
  1. Go to the extracted CPS disc (you ALWAYS start here) and run the setup.bat file.
  2. Tell Windows it's going to be okay.
  3. Confirm that you really want to open that vbs script.
  4. Click OK on the PTC Solution Installer screen to get started.
  5. You will see some nice links to relevant guides.  Click Next.
  6. Sign away your rights.  Click Next.
  7. Don't you love the way they word it saying it's basically to help you?  They just want to know if you are trying to rip them off so they can sell you more licenses.  Check the box confirming that you have acknowledged an empty box which needed to be checked and move on.

Product/Feature Selection and Installation Location

We are going to install what I would consider the "bare minimum".
  1. You should only see New Product Installation as selectable.  If you see anything else selectable, then you must be installing on a server that has Windchill/Windchill related product(s) installed or some remnants left over.
  2. Select Windchill PDMLink and Windchill ProjectLink.  Click Next.
    1. ProjectLink is included with all the new Windchill license packages (Base, Advanced, and Premium).  It used to be a separate purchase.  I recommend trying to make use of it as I think it is cool.
  3. Under Windchill Base Solution Add-ons, select Windchill Index Search Client.  This is a half of the install process for the Index Server.  We will cover the other part later as you can't do both in the same install process.  Having these installed will allow you to use Search Facets.  You will also not need to use wildcards in your searches anymore.
    1. Scroll down.
  4. Under Windchill Visualization, select Creo View and Thumbnail Generator and Viewable Compression Utilities.  We want these to be able to have publishing of files (CAD and Documents).
    1. Click Next.
  5. It should automatically detect a Java installation and Windchill will Install Apache and Tomcat.
    1. If you want to configure with IIS, see this: https://www.ptc.com/en/support/article/CS58411
    2. Change the Database Software drop down to SQL Server.
    3. Click Next.
  6. If you are going to need a remote file server which allows you to quicken the upload and download speeds for remote users, check the box for Enable Remote File Server Support.  This will increase the install time.  You can create the discs necessary for this later on via command line.  Click Next.
  7. If you are going the simple route of having Windchill do things for you i.e. my route, leave the checkboxes under Create as is.  You can manually configure the database by following this article: https://www.ptc.com/en/support/article/CS28197
    1. If you go the manual route, you need to check the boxes under Use Existing.
    2. Click Next.
  8. The Installation Name doesn't matter.  Click Next.
  9. Change the drive path of the very first box titled Base Installation Directory to where you want to install Windchill.  The other boxes will auto update with the new base path.  I always recommend putting it on another drive/partition.  
    1. You should see the Java directory autopopulate.  If it doesn't, manually browse to it using my screenshot as a guide.
    2. Click Next.

Apache and LDAP Settings

  1. If you have your DNS server configured correctly or you did the Hosts file trick, you should see a proper fully qualified hostname show up for the Web Server DNS Registered Host Name box.  If you see something that you didn't expect, stop now and fix it before continuing.  This needs to be what the actual fully qualified hostname will end up being.  No temporary name and don't get lazy and put "localhost".  Click Next.
  2. Select any language packs you may need.  I did not download the language pack disc.  Make sure you download it if you are going to need any other language other than English.  Click Next.
  3. Make sure Other V3 Compliant LDAP is selected under LDAP Service.
    1. Enter the Base Distinguished Name that you created when you installed OpenDJ.  Mine was o=My Company.
    2. Scroll down.
  4. Enter the LDAP manager credentials.  This is what Windchill will use to authenticate with your LDAP to create, modify, delete, and check if user credentials are correct.  You cannot just change this password whenever you want without updating some properties in Windchill.  Here is a link to what you need to do if you want to change the password in the future:
    1. https://www.ptc.com/en/support/article/CS96619
    2. Click Next.
  5. Nothing changes on this screen.  Click Next.

SQL Server Settings

  1. Leave everything as is.  I don't recommend loading demo data even if this will be a test server.  You can always load this manually after the install.  If you load it now, you will find it very hard to get everything deleted and reset to OOTB.  I recommend installing without it, taking a full backup, and then loading it.  Do that only if you really want to see the demo data of course.  It's nothing special.
  2. Change the Define Database Size to Large.  I believe auto size increase is disabled if you accidentally select demo/test.  Avoid the hassle and just choose Large.
  3. Create a folder where you would like the SQL data files to be stored.  I used E:\ptc\Windchill\datafiles.  You might have some permission issues if you leave it as is which will cause the installation to fail.
    1. If you are lucky, the SQL Server Client Installation Directory will be populated for you, if it isn't, follow my screenshot to manually browse to it.
    2. Enter your instance name if you used that during the SQL Server installation.  I didn't so I will leave it blank.
    3. Enter the port number if you got fancy and changed it from the default.
    4. Scroll down.
  4. Very important!  If you are going the "simple route" by allowing Windchill to create the database for you, then you need to have the sa password to do this and it must abide by the Windows Server password policy.  You can change or have IT change the password after the install but you need it for this part.  The only other route is to create the database manually which I  have linked a guide for that in the Product/Feature Selection, and Installation Location section above.
    1. The installer is going to use the sa account to also create a database user which Windchill will be using to authenticate with the database.  To summarize, Windchill doesn't use the sa account, it only uses the account you create here.  I am calling it pdmlink.
    2. If you ever need to change the pdmlink password, you must follow this article:
      1. https://www.ptc.com/en/support/article/CS117247
  5. I have attempted to click next with a bad password in order to give you the extra requirements you need to follow for creating a password for your pdmlink account.  It needs to satisfy both the Windows Server password policy and these extra special character restrictions that come from the installer side.  Once you manage to create a password that works for both.  Click Next.

Licensing, Admin Account, and Organization Name Settings

  1. You are welcome to simplify the licensing process by trying your luck at logging in through this screen.  It has rarely worked for me so I will check configure licensing later.
  2. Uncheck the Windchill Performance Advisor box to disable it.  This is a service that runs and sends data to PTC.  There is a dashboard through the support website where you can see recommendations based on the data that got sent.  It is a way to try to keep on top of things like performance issues.
    1. Click Next.
  3. If you manually created an account in your LDAP, you can give that information here to link it as the admin.  I am going to let the installer create an account for me.  Click Next.
  4. I recommend leaving the object identity uniqueness setting at the Organization option. 
    1. A quick overview of the hierarchy of Windchill Contexts.
      1. There is only one site.
      2. Under Site, there can be many Organizations.
      3. Under each Organization, there can be many products, libraries, projects, etc.
      4. Windchill has a requirement for number and filename uniqueness for CAD.  If you keep the setting at Organization, each organization can have a CAD object with the same number and/or filename as one in another Organization.  This is okay because you can't have a non-admin account which can be a member of more than one organization at a time.  If you set it to Site, the entire system can only have a single CAD object with a number of 123 and/or a filename of screw.prt.  The uniqueness is for number and filename individually and not combined.  Hopefully that makes sense.
      5. Leaving it at Organization is good in case your company gets bought out or another company gets bought by yours.  Then they can put their data in the same system under a different Organization without worrying about conflicts.
    2. The Web Application Context Root is what you will be typing into your browser address bar when you want to access Windchill.  Leaving it as is means you must also use a capital "W" in order to access windchill i.e. http://<your hostname>/Windchill
    3. The Initial Organization Name can be changed later but you must follow a procedure as listed here:
      1. https://www.ptc.com/en/support/article/CS52976
    4. The Organization Internet Domain Name should match the domain you set for the computer.  Again, make sure this is correct before moving on.
    5. Click Next.

Apache Solr (Index Search), Staging Directory, and Running the Installer

  1. I am going to reiterate my recommendation of installing Solr (Index Server).  On this screen, despite the lack of a second "confirm password box", you are actually creating an account that Windchill will use to authenticate with the Index Server.  Make sure you write down this password just like all the others.  
  2. Select any language you want the server to index.  Click Next.
  3. Change your settings to match my screenshot.  Click Next.
  4. You already have the CPS patch location selected as a staging area.  Now add a stagging directory for the rest of the unzipped discs you downloaded. 
  5. If anything is missing, you need to download or make sure you actually extracted the file first.  Click Next.
  6. Confirm all of your settings.  This is your last chance to change anything.  An htm file of this summary will be stored in the E:\ptc\Windchill\PSI\installer directory called summary.htm.
    1. Click Install.
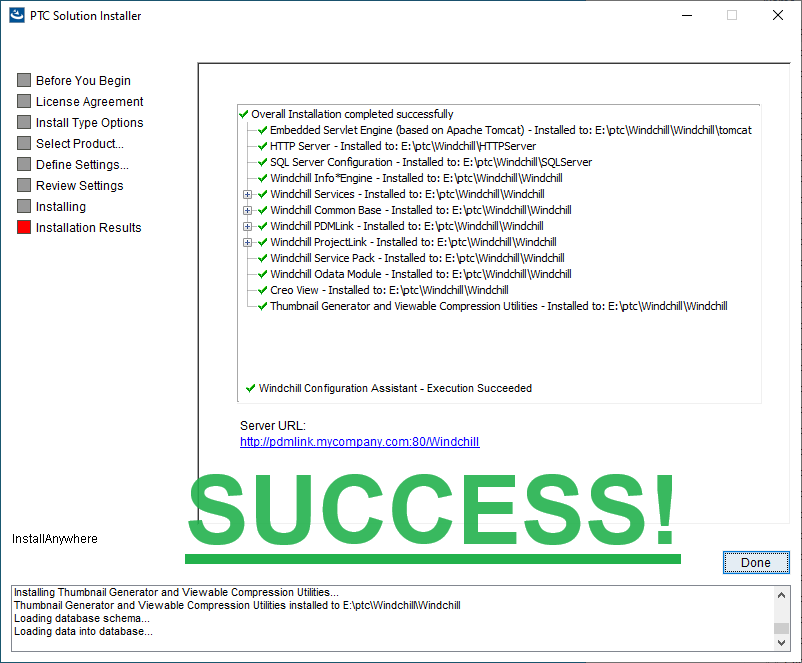
  7. It takes about an hour to install.  You might get constantly prompted to allow setup.vbs files to run so keep an eye on it.  If everything installed successfully, you should seen that final screen with all those nice green checkmarks.
  8. Try going to the webpage and login as wcadmin.
  9. You have now logged in and have been bombarded with junk.  Click okay on that Performance Advisor box, exit that License Alert Box, scroll down and check the box to not show this welcome message again.
  10. Now you are able to click the home icon to get to the real home page.
  11. In the top right corner, click on Quick Links -> Help -> About Windchill
    1. You will now see the version of everything you have installed.
    2. You win!

Windchill Licensing: The Manual Route

If you weren't able to login during the installer process, you need to manually go and request your license.
  1. Login as wcadmin -> Navigator Bar -> Browse tab -> Site -> Utilities
  2. Click on License Manager under the System Administration section.
  3. On the Settings tab, copy your License Host ID.  It is a long string.
  4. Login to https://support.ptc.com and click on Manage Licenses in the Popular Tasks Box on the right.
  5. Scroll down to the ThingWorx/ThingWorx Navigate/Windchill box.
    1. Select the correct version of Windchill (13 is not listed so you can select 12.0.2+).
    2. Paste in your Host ID you copied earlier.
    3. Click Retrieve.
  6. Give it a minute or so and refresh your page.
    1. You will eventually see a license file in the License Repository Section.
    2. Click Download.
  7. Click Cancel on the short tag popup.
  8. Save the .bin file to your server.
  9. Go back to the License Management Popup.
    1. Click Browse and select the license file you downloaded.
    2. Click Process Capability Response.
  10. Your should be a Success popup if it worked.
  11. Double check by going to the License Information tab.
    1. You will see all the license you own there as well and their availability.

Next Steps

There you go.  A licensed server that won't just shut down on you after a timeout period.  There will be a Part 4 to show you how to install the Index Server.  Stay tuned.
0 Comments

Your comment will be posted after it is approved.


Leave a Reply.

    Author

    Erick Johnson

    Archives

    August 2025
    June 2025
    May 2025
    May 2024
    July 2017
    May 2017
    February 2017
    January 2017
    August 2016
    July 2016
    June 2016
    May 2016
    April 2016
    March 2016

    Categories

    All
    ASP.NET
    Batch Script
    C#
    Career
    Computers
    Creo
    Creo API
    GameMaker
    GitHub
    Home Loan
    How To
    HTML5
    Java
    JavaScript
    MAME
    Mortgage
    .NET Core
    Office
    PC Games
    PowerShell
    Robot
    SQL
    Video Games
    Web App
    Windchill
    Windchill API

    RSS Feed

Copyright © 2026 Erick Johnson
  • Home
  • Music
  • Blog
  • Apps
    • Mortgage Calculator
  • Windchill
    • Windchill Customizations
    • E.P.L.E.S.
    • Export Released
    • Document Exporter
    • Document Worker
    • Property Checker
    • Windchill Business Analytics >
      • Part 01 - Program Logic
      • Part 02 - Getting Data with SQL Queries
      • Part 03 - Automating SQL Queries
      • Part 04 - Converting SQL Results to XML
      • Part 05 - Data Processing and Manipulation
      • Part 06 - Displaying XML in HTML
      • Part 07 - Auto Updating Displayed Data
      • Part 08 - Hosting Webpage with an Existing Apache Installation
      • Part 09 - Running Multiple Queries In Sequence
      • Part 10 - Calculating Data Trends
      • Part 11 - Making It Modular
    • Windchill Quick View
  • PowerShell
    • Blog & Examples
    • Excel Reference
  • Contact